


Introduction
Infrastructure as code (IaC) tools allow you to manage infrastructure with configuration files rather than through a graphical user interface. IaC allows you to build, change, and manage your infrastructure in a safe, consistent, and repeatable way by defining resource configurations you can version, reuse, and share.
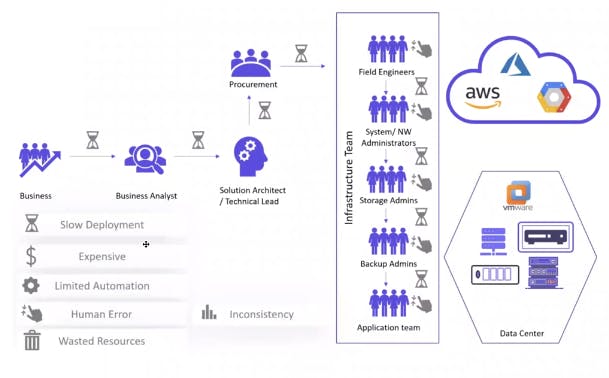
Challenges in IT Infrastructure
Terraform
Terraform is HashiCorp's infrastructure as a code tool. It lets you define resources and infrastructure in human-readable, declarative configuration files and manage your infrastructure's lifecycle. Using Terraform has several advantages over manually managing your infrastructure.
Terraform can manage infrastructure on multiple cloud platforms.
The human-readable configuration language helps you write infrastructure code quickly.
Terraform state allows you to track resource changes throughout your deployments.
You can commit your configuration to version control to safely collaborate on infrastructure.
Installation
- Create an instance and install all of this.
Ensure that your system is up to date and that you have installed the gnupg, software-properties-common, and curl packages: You will use these packages to verify HashiCorp's GPG signature and install HashiCorp's Debian package repository.
sudo apt-get update && sudo apt-get install -y gnupg software-properties-common
Install the HashiCorp GPG key.
wget -O- https://apt.releases.hashicorp.com/gpg | \
gpg --dearmor | \
sudo tee /usr/share/keyrings/hashicorp-archive-keyring.gpg
Verify the key's fingerprint.
gpg --no-default-keyring \
--keyring /usr/share/keyrings/hashicorp-archive-keyring.gpg \
--fingerprint
Add the official HashiCorp repository to your system. Thelsb_release -cs command finds the distribution release codename for your current system, such as buster, groovy, orsid.
echo "deb [signed-by=/usr/share/keyrings/hashicorp-archive-keyring.gpg] \
https://apt.releases.hashicorp.com $(lsb_release -cs) main" | \
sudo tee /etc/apt/sources.list.d/hashicorp.list
Download the package information from HashiCorp.
Install Terraform from the new repository.
sudo apt update
sudo apt-get install terraform
Verify that the installation worked by opening a new terminal session and listing Terraform's available subcommands.
terraform -help
Usage: terraform [-version] [-help] <command> [args]

The available commands for execution are listed below.
The most common, useful commands are shown first, followed by
less common or more advanced commands. If you're just getting
started with Terraform, stick with the common commands. For the
other commands, please read the help and docs before usage.
#...
HCL
Hashicorp Configuration Language, This low-level syntax of the Terraform language is defined in terms of a syntax called HCL, which is also used by configuration languages in other applications and, in particular, other HashiCorp products. It is not necessary to know all of the details of HCL syntax to use Terraform; just knowing the basics should be enough.
<block> <parameters> {
    key1 = value1
    key2 = value2
}
Writing HCL code
The Terraform language syntax is built around two key syntax constructs:
Arguments
Blocks (resource)
A block is a container for other content and An argument assigns a value to a particular name:
filename="/home/ubuntu/abc123.txt"
The identifier before the equals sign is the argument name, and the expression after the equals sign is the argument value.
Create a local file:
Create a local.tf file and write code by following the code.
Save this file.
resource "local_file" "pet"{
    filename = "/root/pets.txt"
    content = "We love pets!"
}
Here, "resource" is a block name.
"local_file": This is a resource type. Importantly, this is the provider.
"pet": This third argument is the resource name.
Note: Inside the curly bracket is an argument syntax.
"filename = "/root/pets.txt": This is the file name that we want to create.
"content = "I love pets!": This is the content of the file.
Resource block: block name used to mention the type of the block The resource block expects two labels, which are local_file and "pet" in the example above. A particular block type may have any number of required labels, or it may require none.
resource "provider>_resource type> "<resource name>"{
Argument1 =" "
Argument2 =" "
}
Local = provider; file = type; pet = name of the resource.
Then we have arguments: filename, content, etc
terraform validate
- Initialized the file by following the command.
terraform init
Note: This command will install whatever we write in our local.tf file.
Example Output:

Initialized the backend.
Install Hashicorp's local provider file-making mechanism.
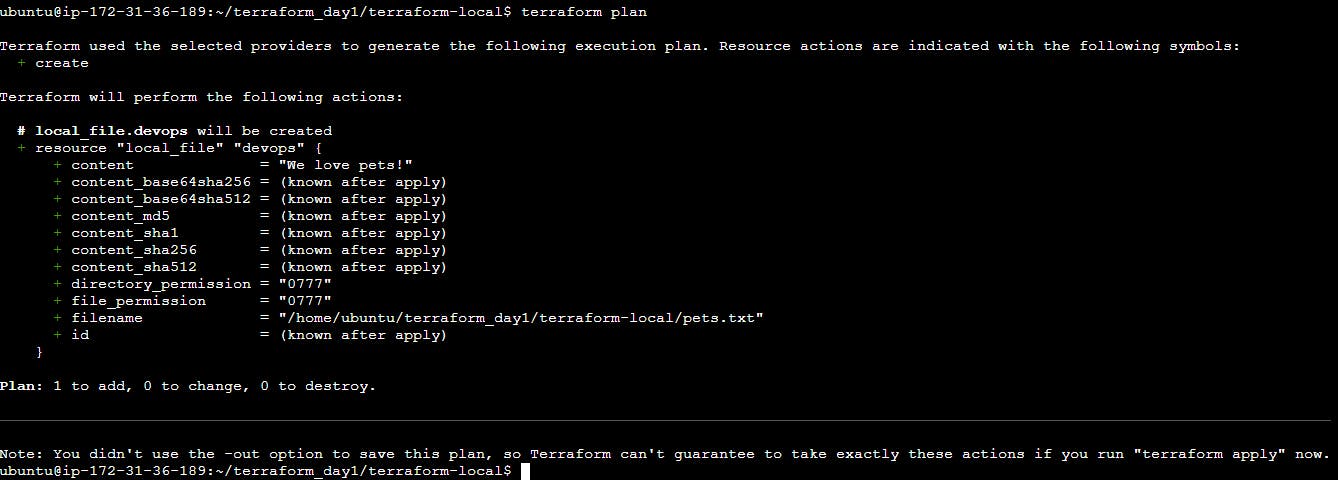
Terraform plan: If we see what steps are taken by Terraform when we run the above command, then we will see the full operations. Run the following command.
terraform plan
Example Output:
- Run the HCL file with the following command:
terraform apply
Note: Once we apply this HCL, we will see one file created, and inside the file, we will see our text message.
Important Note: Once we do it, we will see a file called "terraform.tfstate" like this. This file is a log file. Terraform always creates his log file automatically.
Creating multiple resources.
We can have multiple resources in a single file.
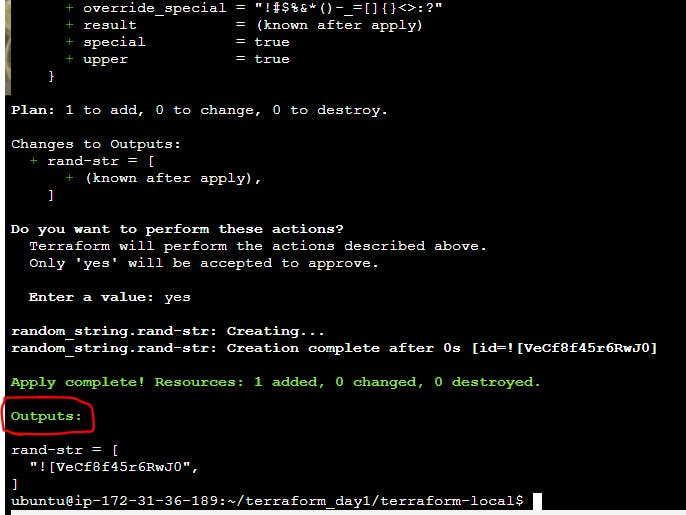
resource "random_string" "rand-str" {
length = 16
special = true
override_special = "!#$%&*()-_=[]{}<>:?"
 }
output "rand-str"{
value = random_string.rand-str[*].result
}
Run the following command:
terraform init
#To check all configuration valid or not.
terraform validate
terraform apply
Example output:
Execution of Infrastructure
Init->plan->apply
terraform init
This command will scan your tf files in that folder and install all the required automation things
terraform plan
This command will create an execution plan for terraforming, including the things that will be installed, the names, and the properties added.
terraform apply
The actual execution and automation happen in this command
Terraform with Docker
Terraform needs to be told which provider to use in the automation; hence, we need to give the provider name, source, and version.
For Docker, We can use this block of code in your main. tf
Terraform block
terraform{

  required_providers{

    docker = {

       source = "kreuzwerker/docker"

       version = "~>2.21.0"

}

}

}
provider"docker"{}
Note: kreuzwerker/docker is shorthand for registry.terraform.io/kreuzwerker/docker.
Provider
The provider block configures the specified provider, in this case, Docker. A provider is a plugin that Terraform uses to create and manage your resources.
provider"docker"{}
Resource
Use resource blocks to define components of your infrastructure. A resource might be a physical or virtual component, such as a Docker container, or it can be a logical resource, such as a Heroku application.
Resource blocks have two strings before the block: the resource type and the resource name.
In this example, The first resource type is docker_image, and the name is Nginx.
resource "docker_image" "nginx" {

name ="nginx:latest"

keep_locally = false

}
resource "docker_container" "nginx" {

image =docker_image.nginx.latest

name = "tutorial"

ports {

   internal = 80

external = 80

}

}
Full terraform code for NGINX
terraform{
  required_providers{
    docker = {
       source = "kreuzwerker/docker"
       version = "~>2.21.0"
}
}
}
provider"docker"{}

resource "docker_image" "nginx" {
 name ="nginx:latest"
 keep_locally = false
}
resource "docker_container" "nginx" {
 image = docker_image.nginx.latest
 name = "tutorial"
 ports {
        internal = 80
        external = 80
}
}
Note: If Docker is not installed,
sudo apt-get install docker.io
sudo docker ps
sudo chown $USER /var/run/docker.sock
- Now apply the terraform commands below.
Terraform commands
terraform init
terraform plan
terraform validate
terraform show
terraform state list
#To apply this code
terraform apply
Note: Once we run main.tf successfully, copy the public IP, open a new tab, and browse it. It should work.
DAY 2
Terraform Variables
We can create a variable.tf file that will hold all the variables.
variable "filename"{

default="/home/ubuntu/terraform-tutorials/terraform-variables/demo-var.txt"

}
variable "content"{

default ="This is coming from a variable which was updated"

}

These variables can be accessed by var object in main.tf

resource "local_file" "devops"{

filename = var.filename

content = var.content

}
Data Types in Terraform
variable "file_contents" {
  type    = map
  default = {
    "statement1" = "this is cool"
    "statement2" = "this is cooler"
  }
}
List
#List string
variable "prefix" {
    default =["Mr", "Mrs","Sir"]
    type = list(string)
}

#List number
variable "prefix" {
    default =[1, 2,3]
    type = list(number)
}
Set
#Set string
variable "prefix" {
    default =["Mr", "Mrs","Sir"]
    type = set(string)
}
#Set number
variable "prefix" {
    default =[1, 2,3]
    type = set(number)
}
Object
variable "devops" {
    type = object({
    name = string
    items = list(number)
})

    default = {
    name = "Mohammad"
items = [1,2,3]
}
}
Outputs
output "devops-op{
value = var.devops.name
}

output "devops-items"{
value = var.devops.items
}
use terraform refresh
To refresh the state of your configuration file, reload the variables
Terraform State
Whenever we do terraform init, the plugins are installed
Whenever we do a terraform plan, the execution plan is generated.
Whenever we apply Terraform, the execution is done and the state is maintained
If we don't hate the state, we can still run the above commands, but the state is useful to keep a record of why and how infrastructure was created in the first place.
The state is like a blueprint of the real-world infrastructure, with some unique IDs and attributes.
Terraform with AWS
Provisioning on AWS is quite easy and straightforward with Terraform.
Prerequisites
- AWS CLI installed
The AWS command-line interface (AWS CLI) is a unified tool to manage your AWS services. With just one tool to download and configure, you can control multiple AWS services from the command line and automate them through scripts.
- AWS IAM user
IAM (Identity Access Management) AWS IAM is a web service that helps you securely control access to AWS resources. You use IAM to control who is authenticated (signed) and authorized (has permissions) to use resources.
In order to connect your AWS account and Terraform, you need the access keys and secret access keys exported to your machine.
export AWS_ACCESS_KEY_ID=access key>
export AWS_SECRET_ACCESS_KEY = secret access key>
install required providers
terraform {
required_providers{
    aws={
    source = "hashicorp/aws"
    version = "~>4.16"
}
}
    required_version=">=1.2.0"
}
Add the region where you want your instance to be
provider "aws" {
region="us-east-1"
}
AWS EC2 instance provisioning
resource "aws_instance" "aws_ec2_test"{
    count = 4
    ami ="ami-08c40ec9ead489470"
    instance_type="t2.micro"
    tags ={
Name="TerraformTestServerInstance"
}
}
Get the public IPs for the provisioned instance
output "instance_pub_ip"{

    value =aws_instance.aws_ec2_test[*].public_ip

}
AWS S3
For s3, the bucket name should be unique
resource "aws_s3_bucket" "b"{
bucket ="mohammad-tf-test-bucket"

tags ={
Name = "mohammad-bucket"
Environment ="Dev"
}
}
Terraform State commands
Terraform State List: List resources within Terraform State.
terraform-state mv: Move iteams within the terraform state. This will be used for resource renaming without destroying the command.
terraform state pull: Manually download and output the state from the state file.
terraform state push: Manually upload a local state file to the remote state.
terraform state rm: Remove teams from the state. Items removed from the state are not physically destroyed. This item is no longer managed by Terraform.
terraform state show: Show attributes of a single resource in the state.
States
Terraform uses the state to keep track of the infrastructure it manages. To use Terraform effectively, you must keep your state accurate and secure.
The state is a requirement for Terraform to function. It is often asked if it is possible for Terraform to work without a state or for Terraform to not use a state and just inspect cloud resources on every run.
Terraform requires some sort of database to map terraform configuration to the real world. Alongside the mapping between resources and remote objects, terraform must also track metadata such as resource dependencies. Terraform stores a cache of the attribute values for all resources in the state. This is done to improve performance.