Terraform-basic with hands-on work


Introduction
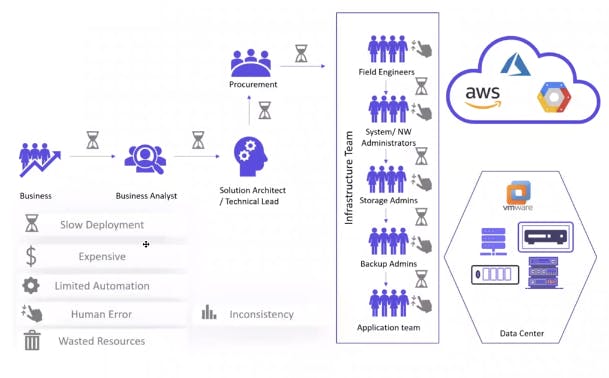
Infrastructure as code (IaC) tools allow you to manage infrastructure with configuration files rather than through a graphical user interface. IaC allows you to build, change, and manage your infrastructure in a safe, consistent, and repeatable way by defining resource configurations you can version, reuse, and share.
Challenges in IT Infrastructure
Terraform
Terraform is HashiCorp's infrastructure as a code tool. It lets you define resources and infrastructure in human-readable, declarative configuration files and manage your infrastructure's lifecycle. Using Terraform has several advantages over manually managing your infrastructure.
Terraform can manage infrastructure on multiple cloud platforms.
The human-readable configuration language helps you write infrastructure code quickly.
Terraform state allows you to track resource changes throughout your deployments.
You can commit your configuration to version control to safely collaborate on infrastructure.
1. Create a Linux server
In my case, I used an AWS EC2 instance.
2. Install Terraform.
Ensure that your system is up to date and that you have installed the gnupg, software-properties-common, and curl packages: You will use these packages to verify HashiCorp's GPG signature and install HashiCorp's Debian package repository.
sudo apt-get update && sudo apt-get install -y gnupg software-properties-common
Install the HashiCorp GPG key.
wget -O- https://apt.releases.hashicorp.com/gpg | \
gpg --dearmor | \
sudo tee /usr/share/keyrings/hashicorp-archive-keyring.gpg
Verify the key's fingerprint.
gpg --no-default-keyring \
--keyring /usr/share/keyrings/hashicorp-archive-keyring.gpg \
--fingerprint
Add the official HashiCorp repository to your system. The lsb_release -cs command finds the distribution release codename for your current system, such as buster, groovy, or sid.
echo "deb [signed-by=/usr/share/keyrings/hashicorp-archive-keyring.gpg] \
https://apt.releases.hashicorp.com $(lsb_release -cs) main" | \
sudo tee /etc/apt/sources.list.d/hashicorp.list
Download the package information from HashiCorp.
Install Terraform from the new repository.
sudo apt update
sudo apt-get install terraform
To check whether Terraform is installed or not, run the following command:
terraform --version
HCL
Hashicorp Configuration Language, This low-level syntax of the Terraform language is defined in terms of a syntax called HCL, which is also used by configuration languages in other applications and, in particular, other HashiCorp products. It is not necessary to know all of the details of HCL syntax to use Terraform; just knowing the basics should be enough
<block> <parameters> {
    key1 = value1
    key2 = value2
}
Writing HCL code
The Terraform language syntax is built around two key syntax constructs:
Arguments
Blocks (resource)
A block is a container for other content and An argument assigns a value to a particular name:
filename="/home/ubuntu/abc123.txt"
The identifier before the equals sign is the argument name, and the expression after the equals sign is the argument value.
3. Create a folder
Inside my instance, I have created a folder because all kinds of Terraform code or infrastructure code will be stored in this directory/folder.
Now, here we can make a file by using vim <filename.txt>. then we will save it. cat it to see inside the file. These four steps were consumed a few times. We don't have that much time.
We can write a script to do this work:
Create a folder for local files: mkdir terraform_local
Go to the folder and create a local Terraform file: vim local.tf inside this file now writes the code. Terraform script is written in the Hashicorp (HCL) configuration language.
resource "local_file" "devops"{
        filename ="/home/ubuntu/terraform/terraform_local/devops_automated.txt"
        content = "I want to become a DevOps Engineer"
}
Here, I have created a tf file. Write HCL code.
In the file name option, after entering the path, there is a need to mention the file name with an extension. Here, devops_automated.txt will be our file. Inside the file, it will be written, "I want to become a DevOps Engineer."
Now provide a local provider by using the following command:
terraform validate
terraform init
Output Like this:
ubuntu@ip-172-31-86-252:~/terraform/terraform_local$ terraform init

Initializing the backend...

Initializing provider plugins...
- Finding latest version of hashicorp/local...
- Installing hashicorp/local v2.4.0...
- Installed hashicorp/local v2.4.0 (signed by HashiCorp)

Terraform has created a lock file .terraform.lock.hcl to record the provider
selections it made above. Include this file in your version control repository
so that Terraform can guarantee to make the same selections by default when
you run "terraform init" in the future.

Terraform has been successfully initialized!

You may now begin working with Terraform. Try running "terraform plan" to see
any changes that are required for your infrastructure. All Terraform commands
should now work.

If you ever set or change modules or backend configuration for Terraform,
rerun this command to reinitialize your working directory. If you forget, other
commands will detect it and remind you to do so if necessary.
Now validate the terraform file by following the command.
terraform validate
Output is like this:
ubuntu@ip-172-31-86-252:~/terraform/terraform_local$ terraform validate
Success! The configuration is valid.
If we want to see what is done to terraform in the background by following the command.
Terraform plan: If we see what steps are taken by Terraform when we run the above command, then we will see the full operations. Run the following command:
terraform plan
Output is like this:
ubuntu@ip-172-31-86-252:~/terraform/terraform_local$ terraform plan

Terraform used the selected providers to generate the following execution plan. Resource actions are indicated with the following symbols:
  + create

Terraform will perform the following actions:

  # local_file.devops will be created
  + resource "local_file" "devops" {
      + content              = "I want to become a DevOps Engineer"
      + content_base64sha256 = (known after apply)
      + content_base64sha512 = (known after apply)
      + content_md5          = (known after apply)
      + content_sha1         = (known after apply)
      + content_sha256       = (known after apply)
      + content_sha512       = (known after apply)
      + directory_permission = "0777"
      + file_permission      = "0777"
      + filename             = "/home/ubuntu/terraform/terraform_local/devops_automated.txt"
      + id                   = (known after apply)
    }

Plan: 1 to add, 0 to change, 0 to destroy.

───────────────────────────────────────────────────────────────────────────────────────────────────────────────────────────────────────────────────────────────────────────

Note: You didn't use the -out option to save this plan, so Terraform can't guarantee to take exactly these actions if you run "terraform apply" now.
Apply to the Terraform file that we have created before.
terraform apply
Now we will see "devops_automated.txt" This file was created in our local folder.
ubuntu@ip-172-31-31-39:~/terraform_file/terraform-local$ cat terraform.tfstate
{
  "version": 4,
  "terraform_version": "1.6.1",
  "serial": 1,
  "lineage": "5be811c5-e003-ffe2-c4eb-5cb8015a6bf0",
  "outputs": {},
  "resources": [
    {
      "mode": "managed",
      "type": "local_file",
      "name": "devops",
      "provider": "provider[\"registry.terraform.io/hashicorp/local\"]",
      "instances": [
        {
          "schema_version": 0,
          "attributes": {
            "content": "I want to become a DevOps Engineer",
            "content_base64": null,
            "content_base64sha256": "7Bomz4vF3XVHu49LnN0L4i+i1eiVPHkyMORgWgIYzKg=",
            "content_base64sha512": "fKyZda5LnnjQxMygXbBJyt4IacYWgSgOJ/Fg/UsXJ3RcJ/VQOAM1KaVyNgrEyzocS4Cly0oqK5glJxwJ9EUwKA==",
            "content_md5": "d32232fe63e35174f34be01bd0a7911a",
            "content_sha1": "a560d64d054e20890d2bb1225b153233cb917ba6",
            "content_sha256": "ec1a26cf8bc5dd7547bb8f4b9cdd0be22fa2d5e8953c793230e4605a0218cca8",
            "content_sha512": "7cac9975ae4b9e78d0c4cca05db049cade0869c61681280e27f160fd4b1727745c27f55038033529a572360ac4cb3a1c4b80a5cb4a2a2b9825271c09f4453028",
            "directory_permission": "0777",
            "file_permission": "0777",
            "filename": "/home/ubuntu/terraform_file/terraform-local/devops_automated.txt",
            "id": "a560d64d054e20890d2bb1225b153233cb917ba6",
            "sensitive_content": null,
            "source": null
          },
          "sensitive_attributes": []
        }
      ]
    }
  ],
  "check_results": null
}
Multiple resources
We can have multiple resources in a single file.
resource "local_file" "devops"{
        filename ="/home/ubuntu/terraform/terraform_local/devops_automated.txt"
        content = "I want to become a DevOps Engineer"
}
resource "random_string" "rand-str" {

length = 16

special = true

override_special = "!#$%&*()-_=[]{}<>:?"

}

output "rand-str"{

value = random_string.rand-str[*].result

}
local_fileResource (local_file.devops):This resource defines a local file named "devops_automated.txt" and specifies its content.
The
filenameattribute defines the file's path and name as "/home/ubuntu/terraform/terraform_local/devops_automated.txt."The
contentattribute sets the content of the file to "I want to become a DevOps Engineer."
random_stringResource (random_string.rand-str):This resource generates a random string with certain characteristics.
The
lengthattribute specifies the length of the generated string (16 characters).The
specialattribute is set to true, which means the generated string can include special characters.The
override_specialattribute provides a list of specific special characters that can be included in the string. These characters include "!#$%&*()-_=[]{}<>:?".
Output for
random_string:This output section defines an output variable named "rand-str" that retrieves the result of the
random_string.rand-strresource.It uses the
valueattribute to specify the result of therandom_string.rand-strresource.
Run the following command to run the script:
terraform init
terraform validate
terraform apply
terraform state
Terraform with Docker (NGINX)
NGINX is open-source software for web serving, reverse proxying, caching, load balancing, media streaming, and more. It started as a web server designed for maximum performance and stability. In addition to its HTTP server capabilities, NGINX can also function as a proxy server for email (IMAP, POP3, and SMTP) and a reverse proxy and load balancer for HTTP, TCP, and UDP servers.
Terraform needs to be told which provider is to be used in the automation; hence, we need to give the provider name, source and version.
terraform{
  required_providers{
    docker = {
       source = "kreuzwerker/docker"
       version = "~>2.21.0"
}
}
}
provider"docker"{}

resource "docker_image" "nginx" {
 name ="nginx:latest"
 keep_locally = false
}
resource "docker_container" "nginx" {
 image = docker_image.nginx.latest
 name = "tutorial"
 ports {
        internal = 80
        external = 80
}
}
Note: "kreuzwerker/docker" is shorthand for registry.terraform.io/kreuzwerker/docker.
Note: If Docker is not installed,
sudo apt-get install docker.io
sudo docker ps
sudo chown $USER /var/run/docker.sock
Provider
The provider block configures the specified provider, in this case, Docker. A provider is a plugin that Terraform uses to create and manage your resources.
provider"docker"{}
Resource
Use resource blocks to define components of your infrastructure. A resource might be a physical or virtual component, such as a Docker container, or it can be a logical resource, such as a Heroku application.
Resource blocks have two strings before the block: the resource type and the resource name.
Run the following command for Terraform
terraform init
terraform plan
terraform validate
terraform show
terraform state list
#To apply this code
terraform apply
The output looks like this:
ubuntu@ip-172-31-31-39:~/terraform/terraform-docker$ terraform plan

Terraform used the selected providers to generate the following execution plan. Resource actions are indicated with the following symbols:
  + create

Terraform will perform the following actions:

  # docker_container.nginx will be created
  + resource "docker_container" "nginx" {
      + attach           = false
      + bridge           = (known after apply)
      + command          = (known after apply)
      + container_logs   = (known after apply)
      + entrypoint       = (known after apply)
      + env              = (known after apply)
      + exit_code        = (known after apply)
      + gateway          = (known after apply)
      + hostname         = (known after apply)
      + id               = (known after apply)
      + image            = (known after apply)
      + init             = (known after apply)
      + ip_address       = (known after apply)
      + ip_prefix_length = (known after apply)
      + ipc_mode         = (known after apply)
      + log_driver       = (known after apply)
      + logs             = false
      + must_run         = true
      + name             = "tutorial"
      + network_data     = (known after apply)
      + read_only        = false
      + remove_volumes   = true
      + restart          = "no"
      + rm               = false
      + runtime          = (known after apply)
      + security_opts    = (known after apply)
      + shm_size         = (known after apply)
      + start            = true
      + stdin_open       = false
      + stop_signal      = (known after apply)
      + stop_timeout     = (known after apply)
      + tty              = false

      + ports {
          + external = 80
          + internal = 80
          + ip       = "0.0.0.0"
          + protocol = "tcp"
        }
    }

  # docker_image.nginx will be created
  + resource "docker_image" "nginx" {
      + id           = (known after apply)
      + image_id     = (known after apply)
      + keep_locally = false
      + latest       = (known after apply)
      + name         = "nginx:latest"
      + output       = (known after apply)
      + repo_digest  = (known after apply)
    }

Plan: 2 to add, 0 to change, 0 to destroy.
╷
│ Warning: Deprecated attribute
│
│   on main.tf line 16, in resource "docker_container" "nginx":
│   16:  image = docker_image.nginx.latest
│
│ The attribute "latest" is deprecated. Refer to the provider documentation for details.
│
│ (and one more similar warning elsewhere)
╵

─────────────────────────────────────────────────────────────────────────────────────────────────────────────────────────────────────────────────────────────────────────

Note: You didn't use the -out option to save this plan, so Terraform can't guarantee to take exactly these actions if you run "terraform apply" now.
Terraform Variables
- Create a main.tf file.
resource "local_file" "devops" {
        filename = "/home/ubuntu/terraform/terraform-variable/devops_test.txt "
        content = "This is a devops test file"
}
Now if we want to change the "devops_test.txt" file, then normally we can edit the main.tf file. but in a professional way, this is not correct. The main.tf file is for configuration. If we want to change something, then we need to create variables.
main.tf file is for execution, and the variable file is for variables. This process will understand Terraform. When we apply any Terraform file, then Terraform will understand this.
So, create a variable file,
variable "filename" {
        default = "/home/ubuntu/terraform/terraform-variable/devops-automated.txt"

}

variable "content" {
        default = "This is auto generated from a variable"
}
Now, we need to get access to this variable in the Terraform main file."main.tf"
These variables can be accessed by a 'var' object in main.tf
resource "local_file" "devops" {
        filename = "/home/ubuntu/terraform/terraform-variable/devops_test.txt "
        content = "This is a devops test file"
}

resource "local_file" "devops_var" {
        filename = var.filename
        content = var.content
}
Apply this file, and we will see a new file named "devops_automated.txt."

Now we will use variables to change our content without editing our tf file. For this, edit the variable.tf file and add a variable.
variable "filename" {
        default = "/home/ubuntu/terraform/terraform-variable/devops-automated.txt"

}

variable "content" {
        default = "This is auto generated from a variable"
}
 variable "devops_op_trainer" {}
Note: Here we added a new variable, "devops_op_trainer"
Now we will use this variable and add content through the command line.
export TF_VAR_devops_op_trainer="Learning with brothers and sisters"
Now go to your main.tf file and make an output block
resource "local_file" "devops" {
        filename = "/home/ubuntu/terraform/terraform-variable/devops_test.txt "
        content = "This is a devops test file"
}

resource "local_file" "devops_var" {
        filename = var.filename
        content = var.content
}

output "devops_op_trainer" {
value = var.devops_op_trainer
}
terraform apply
Note: If you want to change variable.tf content without editing the variable.tf file, then run this command. export TF_VAR_devops_op_trainer="Learning with brothers and sisters"
Terraform Variable Type
Map
A map variable is a type of variable that allows you to define a collection of key-value pairs. Each key in the map is unique, and you can associate a value with each key. This can be useful when you want to represent a set of related attributes or configuration parameters.
A map is like a dictionary. Here one is key and another is value.
Go to the variable.tf file and add a variable
variable "filename" {
        default = "/home/ubuntu/terraform/terraform-variable/devops-automated.txt"

}

variable "content" {
        default = "This is auto generated from a variable"
}
 variable "devops_op_trainer" {}

variable "content_map" {
type = map
default = {
"content1" = "This is a cool content 1"
"content2" = "This is a cooler content 2"
}
}
Here I just add a variable (map). If we want to use any content, then just use the name.
Now, go to the main.tf file and edit it. Give these two variables and call them.
resource "local_file" "devops" {
        filename = "/home/ubuntu/terraform/terraform-variable/devops_test.txt "
        content = var.content_map ["content1"]
}

resource "local_file" "devops_var" {
        filename = var.filename
        content = var.content_map ["content2"]
}

output "devops_op_trainer" {
value = var.devops_op_trainer
}
See the terraform plan and see what happens inside it.
ubuntu@ip-172-31-31-39:~/terraform/terraform-variable$ terraform plan
var.devops_op_trainer
Enter a value: yes
local_file.devops: Refreshing state... [id=90cefb688e63e15a1cb250b1ac01574d94b442f3]
local_file.devops_var: Refreshing state... [id=32a0a75ead4449ff66553f663c8950f483829cf2]
Terraform used the selected providers to generate the following execution plan. Resource actions are indicated with the following symbols:
-/+ destroy and then create replacement
Terraform will perform the following actions:
# local_file.devops must be replaced
-/+ resource "local_file" "devops" {
~ content = "This is a devops test file" -> "This is a cool content 1" # forces replacement
~ content_base64sha256 = "WoT+c5nuoeXh7DLK3zzzxwE91HuXjjlgDOeNzSmGUYs=" -> (known after apply)
~ content_base64sha512 = "bEMJY3PluKRHYuK1uKJVQQtTnjkn3Ay3Cv5KR81wQEuxWVUnTrJ3f9oxs/mXDL5/B5nX2UN3qNqygFisdAxfJQ==" -> (known after apply)
~ content_md5 = "e412c45cfa088e02aac5e5d41ae11440" -> (known after apply)
~ content_sha1 = "90cefb688e63e15a1cb250b1ac01574d94b442f3" -> (known after apply)
~ content_sha256 = "5a84fe7399eea1e5e1ec32cadf3cf3c7013dd47b978e39600ce78dcd2986518b" -> (known after apply)
~ content_sha512 = "6c43096373e5b8a44762e2b5b8a255410b539e3927dc0cb70afe4a47cd70404bb15955274eb2777fda31b3f9970cbe7f0799d7d94377a8dab28058ac740c5f25" -> (known after apply)
~ id = "90cefb688e63e15a1cb250b1ac01574d94b442f3" -> (known after apply)
# (3 unchanged attributes hidden)
}
# local_file.devops_var must be replaced
-/+ resource "local_file" "devops_var" {
~ content = "This is auto generated from a variable" -> "This is a cooler content 2" # forces replacement
~ content_base64sha256 = "yDeH4kVU5RUhN35ljh5HGUBT99faLndIYb0dHktb4sw=" -> (known after apply)
~ content_base64sha512 = "c6V5GqS2qZ2W/4hxClcypI6m1WUR7P2fMbWW26eqhu8ZUl6j/RpdHisi+M+OaFbGUEleZ3v9oAfyxwWNRQnsNA==" -> (known after apply)
~ content_md5 = "a609e9b5661664e0154943c6f4d3a165" -> (known after apply)
~ content_sha1 = "32a0a75ead4449ff66553f663c8950f483829cf2" -> (known after apply)
~ content_sha256 = "c83787e24554e51521377e658e1e47194053f7d7da2e774861bd1d1e4b5be2cc" -> (known after apply)
~ content_sha512 = "73a5791aa4b6a99d96ff88710a5732a48ea6d56511ecfd9f31b596dba7aa86ef19525ea3fd1a5d1e2b22f8cf8e6856c650495e677bfda007f2c7058d4509ec34" -> (known after apply)
~ id = "32a0a75ead4449ff66553f663c8950f483829cf2" -> (known after apply)
# (3 unchanged attributes hidden)
}
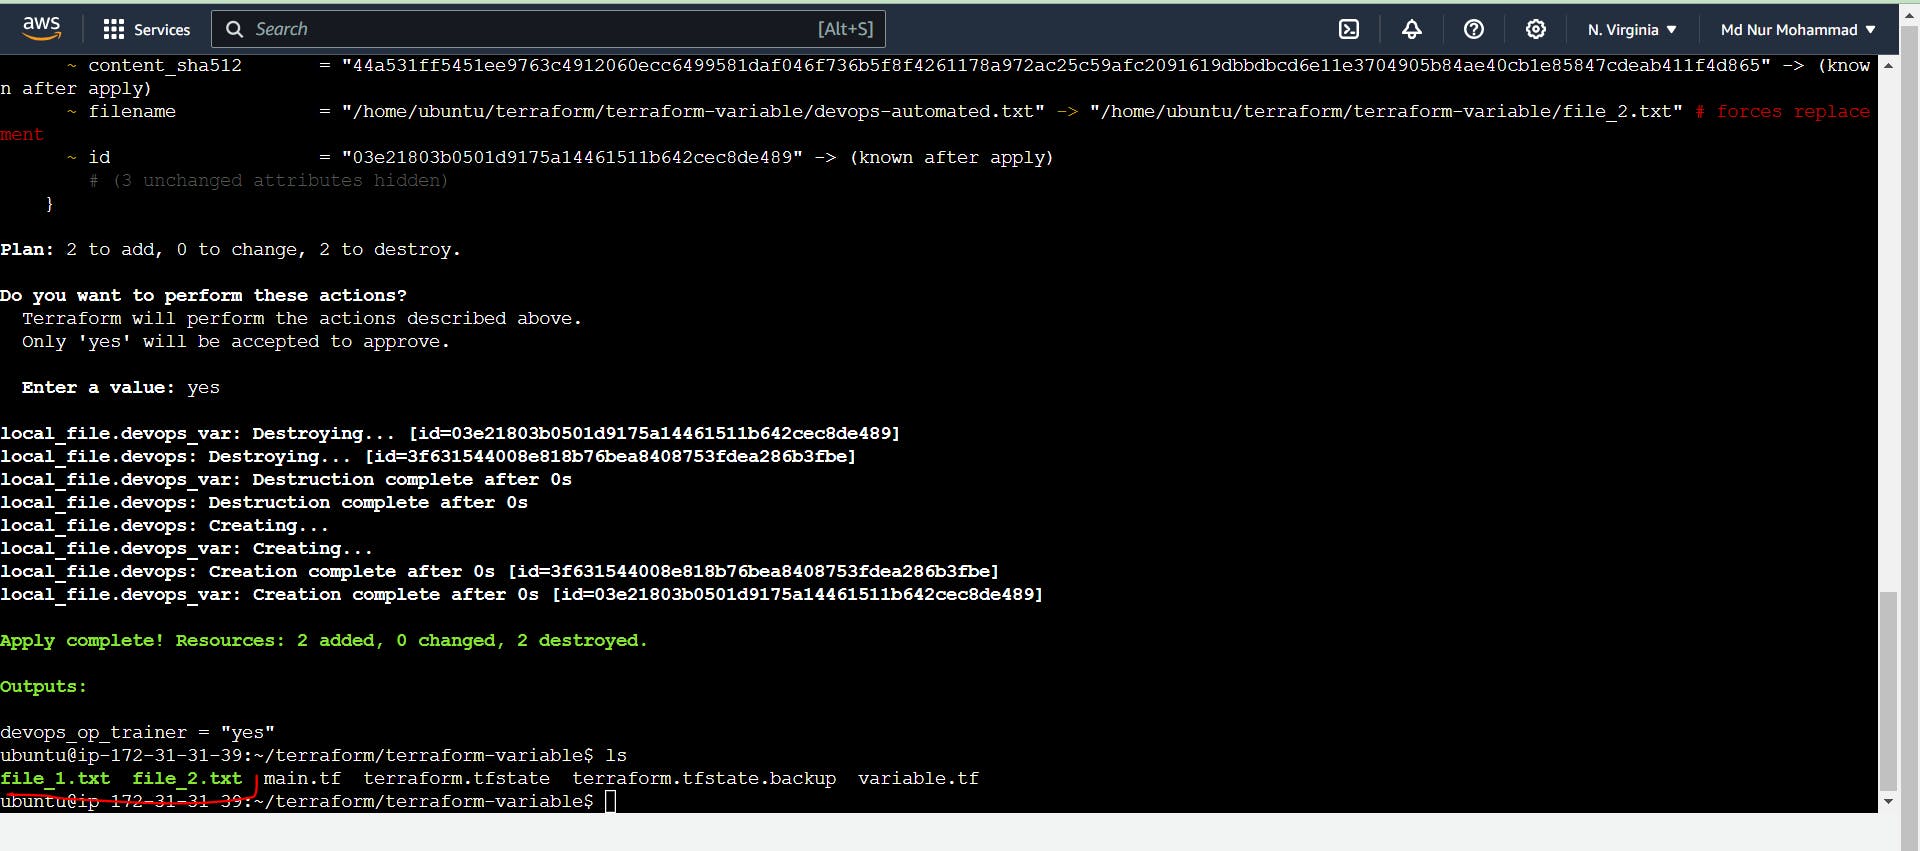
Plan: 2 to add, 0 to change, 2 to destroy.
Changes to Outputs:
~ devops_op_trainer = "wqLearning_with_brothers_and sisters" -> "yes"
─────────────────────────────────────────────────────────────────────────────────────────────────────────────────────────────────────────────────────────────────────────
Note: You didn't use the -out option to save this plan, so Terraform can't guarantee to take exactly these actions if you run "terraform apply" now.
Now apply Terraform, go to the txt file, and see what changed.
Terraform List
Go to the variable file and write a list variable.
        default = "/home/ubuntu/terraform/terraform-variable/devops-automated.txt"

}

variable "content" {
        default = "This is auto generated from a variable"
}
 variable "devops_op_trainer" {}

variable "content_map" {
type = map
default = {
"content1" = "This is a cool content 1"
"content2" = "This is a cooler content 2"
}
}

variable "file_list" {
type = list
default = ["/home/ubuntu/terraform/terraform-variable/file_1.txt","/home/ubuntu/terraform/terraform-variable/file_2.txt"]
}
Now go to the main.tf file and initiate variables
resource "local_file" "devops" {
        filename = var.file_list[0]
        content = var.content_map ["content1"]
}

resource "local_file" "devops_var" {
        filename = var.file_list[1]
        content = var.content_map ["content2"]
}

output "devops_op_trainer" {
value = var.devops_op_trainer
}
Now go to the terraform plan Read all the steps and apply it. So Terraform replaces the file name.
Terraform Object variable
If you need a list, a map with a string, and a number, then use an object variable. Basically, in an object variable, you will select the data type.
Go to variable.tf and add an object variable
"content1" = "This is a cool content 1"
"content2" = "This is a cooler content 2"
}
}

variable "file_list" {
type = list
default = ["/home/ubuntu/terraform/terraform-variable/file_1.txt","/home/ubuntu/terraform/terraform-variable/file_2.txt"]
}

variable "aws_ec2_object"{
type = object ({
        name = string
        instances  = number
        keys = list(string)
        ami = string

})
default = {
        name = "test_ec2_instance"
        instances = 4
        keys = ["key1.pem","key2.pem"]
        ami = "ubuntu=afda..."
}
}
Now go to your main.tf file and create output or resources
resource "local_file" "devops" {
        filename = var.file_list[0]
        content = var.content_map ["content1"]
}

resource "local_file" "devops_var" {
        filename = var.file_list[1]
        content = var.content_map ["content2"]
}

output "devops_op_trainer" {
value = var.devops_op_trainer
}

output "aws_ec2_instances" {
value = var.aws_ec2_object.instances
}
Now apply it.
Terraform State
Whenever we do terraform init, the plugins are installed
Whenever we do a terraform plan, the execution plan is generated.
Whenever we apply Terraform, the execution is done and the state is maintained
If we don't hate the state, we can still run the above commands, but the state is useful to keep a record of why and how infrastructure was created in the first place.
The state is like a blueprint of the real-world infrastructure, with some unique ids and attributes.
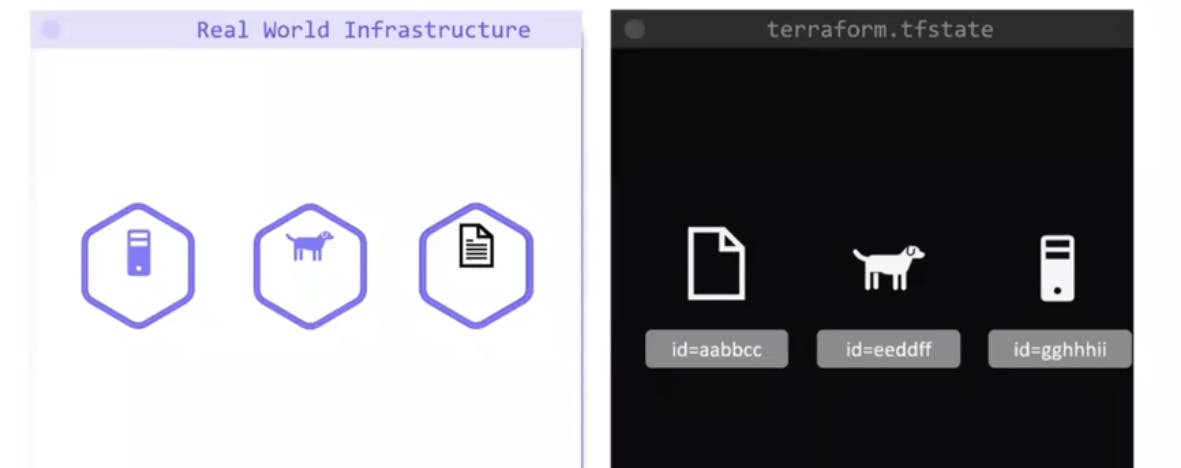
Used to improve performance, dependency management, etc
Important topic:
Terraform Cloud : https://app.terraform.io/app/getting-started
Terraform storage
Backup files.
Terraform with AWS:
Prerequisites
- AWS CLI installed
The AWS command-line interface (AWS CLI) is a unified tool to manage your AWS services. With just one tool to download and configure, you can control multiple AWS services from the command line and automate them through scripts.
sudo apt install awscli
- AWS IAM user
IAM (Identity Access Management) AWS IAM is a web service that helps you securely control access to AWS resources. You use IAM to control who is authenticated (signed) and authorized (has permissions) to use resources.
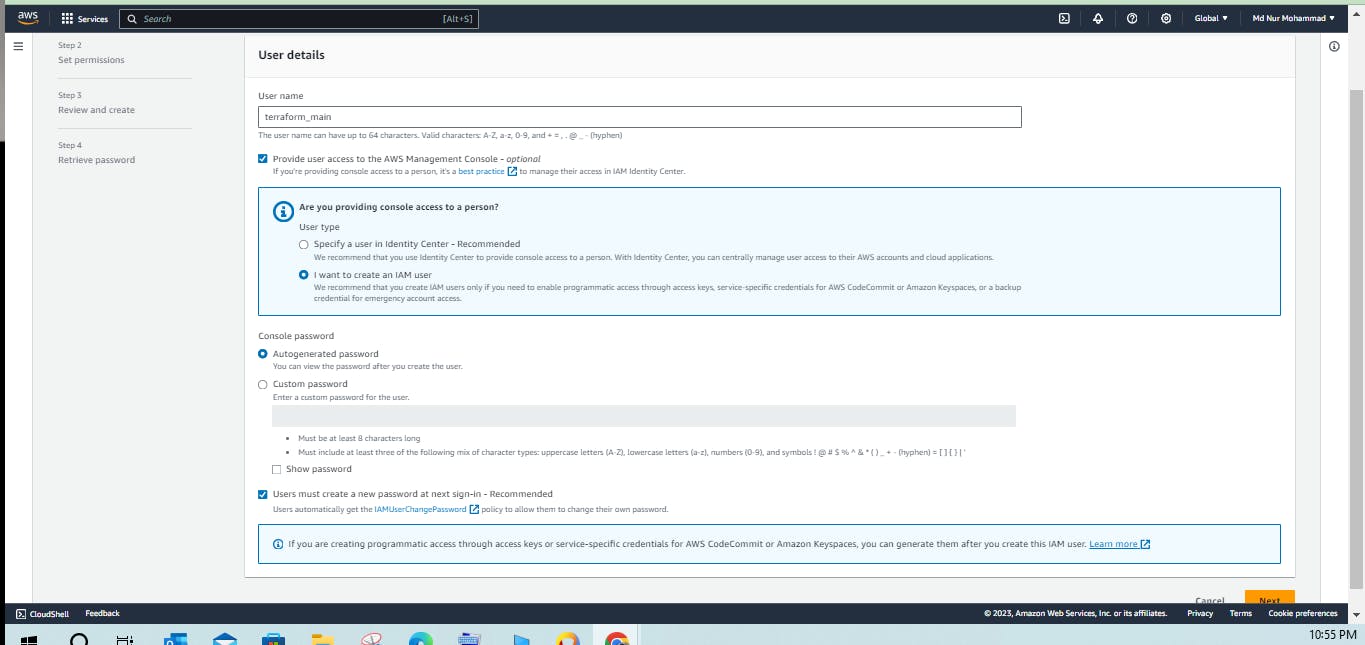
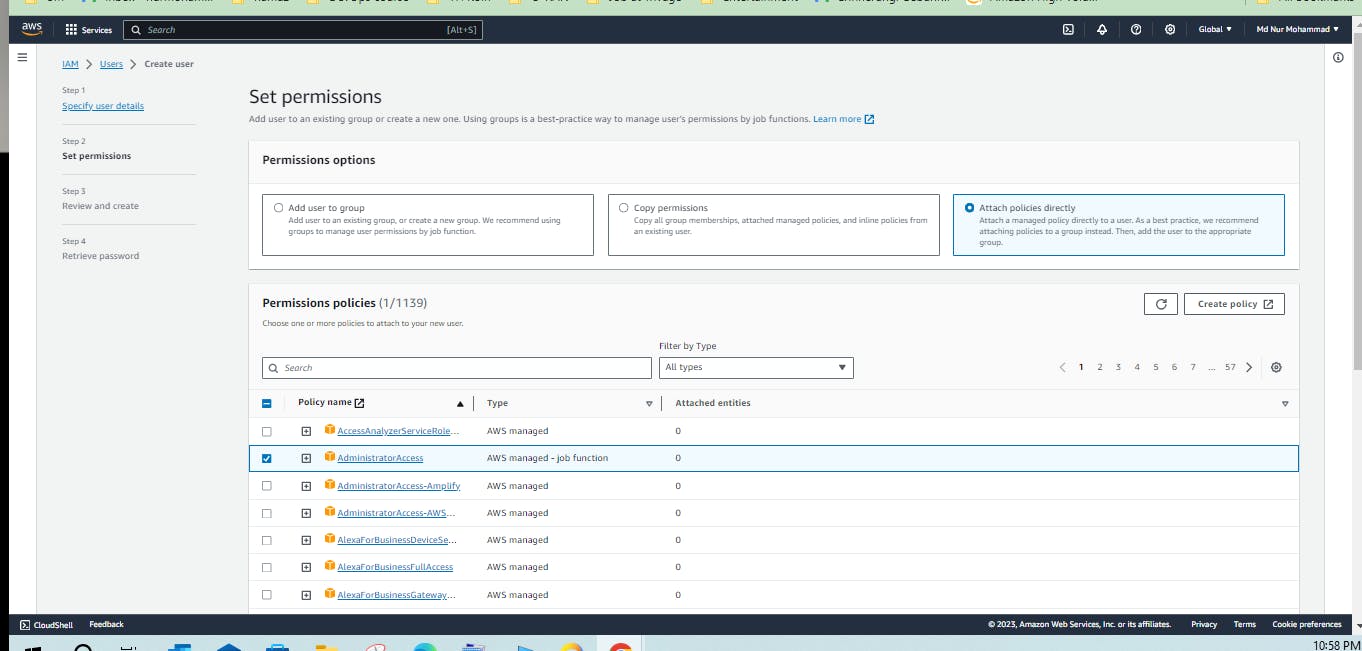
Create a user and create an access key.
In order to connect your AWS account and Terraform, you need the access keys and secret access keys exported to your machine.
aws configure
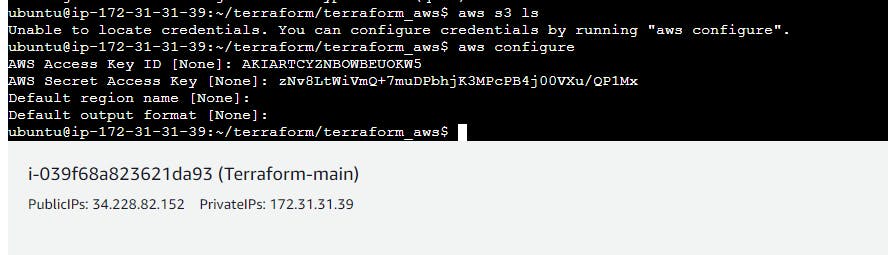
export AWS_ACCESS_KEY_ID=access key>
export AWS_SECRET_ACCESS_KEY = secret access key>

Now we will give AWS access to Terraform
Install required providers
terraform {
required_providers{
    aws={
    source = "hashicorp/aws"
    version = "~>4.16"
}
}
required_version=">=1.2.0"
}

#Add the region where you want your instance to be

provider "aws" {
        region="us-east-1"
}
AWS EC2 instance provisioning
terraform {
required_providers{
    aws={
    source = "hashicorp/aws"
    version = "~>4.16"
}
}
required_version=">=1.2.0"
}

#Add the region where you want your instance to be

provider "aws" {
        region="us-east-1"
}

#Create EC2 instances

resource "aws_instance" "aws_ec2_test"{
    ami ="ami-0fc5d935ebf8bc3bc"
    instance_type="t2.micro"
    tags ={
        Name="aws_ec2_with_terraform"
}
}
required_providersBlock: Specifies that this configuration requires the AWS provider from HashiCorp with a version greater than or equal to 4.16.required_versionBlock: Specifies that this configuration requires Terraform version 1.2.0 or later.provider "aws"Block: Configures the AWS provider with the specified region ("us-east-1").resource "aws_instance"Block: Defines an AWS EC2 instance resource named "aws_ec2_test."count = 1: Indicates that one instance should be created.ami: Specifies the Amazon Machine Image (AMI) ID for the instance.instance_type: Sets the EC2 instance type to "t2.micro."tags: Associates tags with the EC2 instance. In this case, there is a tag with the key "Name" and the value "aws_ec2_with_terraform."
Now, run the following commands:
terraform init
terraform plan
terraform apply
Now, how do we see public IP or private IP? For this, we need to write a Terraform output block; and add this block to the main.tf file and apply it.
output "instance_pub_ip"{
        value =aws_instance.aws_ec2_test[*].public_ip
}
This output block is named "instance_pub_ip," and it specifies that the value of the output is the public IP address of the EC2 instance created using the resource named "aws_ec2_test."
The aws_instance.aws_ec2_test[*].public_ip expression retrieves the public IP address of the EC2 instance. The use of [*] is a splat expression, which is used to flatten the list of public IP addresses into a single list.
Now apply this. If you want to see all of the things regarding instance then go to the state file.
Full documentation: https://registry.terraform.io/providers/hashicorp/aws/latest/docs/resources/instance
Terraform with AWS S3
For s3, the bucket name should be unique. Write this block into main.tf file and apply it.
#Create S3 bucket
resource "aws_s3_bucket" "resoucre_name_my_bucket"{
        bucket ="mohammad-tfs-test-bucket"
        tags ={
                Name = "mohammad-tfs-test-bucket"
                Environment ="Dev"
}
}
aws_s3_bucket: This is the Terraform resource type for an AWS S3 bucket."resoucre_name_my_bucket": This is the local name or alias given to this particular S3 bucket resource instance. You can reference this name elsewhere in your Terraform configuration.
Inside the block:
bucket: Specifies the name of the S3 bucket you want to create, in this case, "mohammad-tfs-test-bucket."tags: Specifies a map of key-value pairs that represent tags for the S3 bucket. Tags are metadata that can be associated with AWS resources. In this example, there are two tags: "Name" with the value "mohammad-tfs-test-bucket" and "Environment" with the value "Dev."
To destroy all of this run the following command: It will terminate all instances and s3 buckets which are created by Terraform.
terraform destroy
Terraform Meta Arguments:
Link: https://developer.hashicorp.com/terraform/language/meta-arguments/depends_on
Terraform meta-arguments are special arguments used in Terraform resource blocks and other constructs to provide additional information or behavior to Terraform itself. These meta-arguments are prefixed with a colon (:) and are used to control how Terraform manages resources, dependencies, and other aspects of the infrastructure provisioning process.
Count meta-arguments: The
countmeta-argument in Terraform is used to create multiple instances of a resource based on a specified count value. It allows you to replicate a resource definition a specific number of times, creating multiple instances of that resource with similar configurations.For-each meta-arguments: The
for_eachmeta-argument in Terraform is used to create multiple instances of a resource based on a map or a set of strings. It allows for more flexibility thancountbecause you can explicitly define the instances and their configurations using keys in the map or set. This is particularly useful when you want to create resources with distinct configurations.Depends on meta-arguments: The
depends_onmeta-argument in Terraform is used to express explicit dependencies between resources. It allows you to specify that one resource depends on another, ensuring that Terraform will create or update the referenced resources before processing the resource with thedepends_onset.Lifecycle meta-arguments: The
lifecyclemeta-argument in Terraform is used to configure aspects of a resource's lifecycle, such as controlling when the resource should be created, updated, or destroyed. Thelifecycleblock can include various settings that affect how Terraform manages the lifecycle of a resource.
Count meta-arguments:
Now create a main.tf file and write codes:
terraform {
required_providers{
    aws={
    source = "hashicorp/aws"
    version = "~>4.16"
}
}
required_version=">=1.2.0"
}

#Add the region where you want your instance to be

provider "aws" {
        region="us-east-1"
}

#Create EC2 instances

resource "aws_instance" "aws_ec2_test"{
    count = 2
    ami ="ami-0fc5d935ebf8bc3bc"
    instance_type="t2.micro"
    tags ={
        Name="aws_ec2_with_terraform- ${count.index}"
}
}
Now apply this and you will see your instances are created with a specific name and number.
For-each meta-arguments:
For-each not working like a Python list. It will work with them to set: (["x","Y","Z"])
Now, make a list: It means make a local variable. First, create a variable and create one for each argument.
terraform {
required_providers{
    aws={
    source = "hashicorp/aws"
    version = "~>4.16"
}
}
required_version=">=1.2.0"
}

#Add the region where you want your instance to be

provider "aws" {
        region="us-east-1"
}

locals {
        instance_name = toset(["Arin","Hea","Shuvo","Shahriar"])
}
#Create EC2 instances

resource "aws_instance" "aws_ec2_test"{
    for_each = local.instance_name
    ami ="ami-0fc5d935ebf8bc3bc"
    instance_type="t2.micro"
    tags ={
        Name= each.key
}
}
Now, apply this main.tf file and you will see the result.
Deeply read this code part by part
terraform {
  required_providers {
    aws = {
      source  = "hashicorp/aws"
      version = "~>4.16"
    }
  }
  required_version = ">=1.2.0"
}
terraform { ... }: This block is used to configure Terraform settings. In this case, it specifies the required version of Terraform and the required provider for the AWS provider. It ensures that the configuration is compatible with Terraform version 1.2.0 or later and uses the AWS provider version 4.x.
provider "aws" {
  region = "us-east-1"
}
provider "aws" { ... }: This block configures the AWS provider. It specifies that the resources defined in this configuration will be created in the "us-east-1" region.
locals {
  instance_name = toset(["Arin", "Hea", "Shuvo", "Shahriar"])
}
locals { ... }: This block defines local variables, which are used to store values that can be reused within the configuration. In this case, it creates a local variable named instance_name and assigns a set of names to it.
resource "aws_instance" "aws_ec2_test" {
  for_each = local.instance_name
  ami      = "ami-0fc5d935ebf8bc3bc"
  instance_type = "t2.micro"
  tags = {
    Name = each.value
  }
}
resource "aws_instance" "aws_ec2_test" { ... }: This block defines an AWS EC2 instance resource named "aws_ec2_test." It uses the for_each meta-argument to create multiple instances based on the values in the local.instance_name set.
for_each = local.instance_name: Iterates over the elements in thelocal.instance_nameset, creating an EC2 instance for each name.ami = "ami-0fc5d935ebf8bc3bc": Specifies the Amazon Machine Image (AMI) ID for the instances.instance_type = "t2.micro": Specifies the EC2 instance type.tags = { Name = each.value }: Tags each EC2 instance with a "Name" tag using the corresponding name from thelocal.instance_nameset.
Important thinking with different OS.
If you need to create different OS servers then you need to make a map (key, value)
terraform {
required_providers{
    aws={
    source = "hashicorp/aws"
    version = "~>4.16"
}
}
required_version=">=1.2.0"
}

#Add the region where you want your instance to be

provider "aws" {
        region="us-east-1"
}

locals {
        instance_name = {"Arin":"ami-05c13eab67c5d8861","Hea":"ami-0fc5d935ebf8bc3bc","Shuvo":"ami-0fc5d935ebf8bc3bc","Shahriar":"ami-05a5f6298acdb05b6"}
}
#Create EC2 instances

resource "aws_instance" "aws_ec2_test"{
    for_each = local.instance_name
    ami = each.value
    instance_type="t2.micro"
    tags ={
        Name= each.key
}
}
Read the explanation below.
locals {
        instance_name = {"Arin":"ami-05c13eab67c5d8861","Hea":"ami-0fc5d935ebf8bc3bc","Shuvo":"ami-0fc5d935ebf8bc3bc","Shahriar":"ami-05a5f6298acdb05b6"}
}
Defines a local variable instance_name, which is a map that associates instance names with their corresponding AMI IDs.
#Create EC2 instances

resource "aws_instance" "aws_ec2_test"{
    for_each = local.instance_name
    ami = each.value
    instance_type="t2.micro"
    tags ={
        Name= each.key
}
}
Defines an AWS EC2 instance resource named "aws_ec2_test" using the values in the
local.instance_namemap.for_each = local.instance_name: Iterates over the keys (instance names) in thelocal.instance_namemap.ami = each.value: Sets the AMI ID for each instance based on the values in thelocal.instance_namemap.instance_type = "t2.micro": Specifies the EC2 instance type.tags = { Name = each.key }: Tags each EC2 instance with its respective name.
With this configuration, Terraform will create four EC2 instances, each with a different AMI ID, and instance name, and tagged with the corresponding name. Note that "Shuvo" and "Hea" instances share the same AMI ID since they have the same value in the local.instance_name map. The instances will be created in the "us-east-1" region.
Note: Please go through this link and practice with all of the arguments.
link: https://developer.hashicorp.com/terraform/language/meta-arguments/depends_on
Terraform Modules:
Modules are containers for multiple resources that are used together. A module consists of a collection of .tf and/or .tf.json files kept together in a directory.
Modules are the main way to package and reuse resource configurations with Terraform.
The Root Module
Every Terraform configuration has at least one module, known as its root module, which consists of the resources defined in the .tf files in the main working directory.
Child Modules
A Terraform module (usually the root module of a configuration) can call other modules to include their resources in the configuration. A module that has been called by another module is often referred to as a child module.
Child modules can be called multiple times within the same configuration, and multiple configurations can use the same child module.
Published Modules
In addition to modules from the local filesystem, Terraform can load modules from a public or private registry. This makes it possible to publish modules for others to use, and to use modules that others have published.
The Terraform Registry hosts a broad collection of publicly available Terraform modules for configuring many kinds of common infrastructure. These modules are free to use, and Terraform can download them automatically if you specify the appropriate source and version in a module call block.
Also, members of your organization might produce modules specifically crafted for your own infrastructure needs. Terraform Cloud and Terraform Enterprise both include a private module registry for sharing modules internally within your organization.
Using Modules
Module Blocks document the syntax for calling a child module from a parent module, including meta-arguments like
for_each.Module Sources documents what kinds of paths, addresses, and URIs can be used in the
sourceargument of a module block.The Meta-Arguments section documents special arguments that can be used with every module, including
providers,depends_on,count, andfor_each.