Linux Basics and Advance
ls To see the details of your list.
ls -ltr
The ls -ltr command is a combination of options used with the ls command in Unix-like operating systems (such as Linux). Here's a breakdown of the options:
ls: This is the command used to list files and directories in a directory.-l: This option enables the long format, providing detailed information about each file or directory, including permissions, owner, group, size, modification date, and name.-t: This option sorts the list of files by modification time, with the newest files appearing first.-r: This option reverses the order of the sort, displaying the oldest files first.
Delete a directory
rmdir "directory_name"
To see zip file content
zcat "file_name"
To display the first few lines of your file in your big file,.
head "file_name"
head -n 5 "file_name"   # it will show top 5 lines
To display the last few lines of your file in your big file,
tail "file_name"
tail -n 5 "file_name"   # It will show bottom 5 lines
To see the live bottom five lines,.
tail -f "file_name"
To see a file in a page format. less make small, small pages.
less "file_name"
more also like less.
more "file_name"
Copy a file from a specific directory and paste it into that directory.
cp devops/lol.txt cloud/
# copy a folder with all file to another folder
cp -r "src_folder/ destination_folder/"
#move a folder to another folder
mv "src_folder/ destination_folder/"
Count the words in your files.
wc "file_name" # wc = word count
Count lines, words, and characters in a file:
wc filenameThis will output three numbers: the number of lines, words, and characters in the file.
Count only the number of lines:
wc -l filenameThe
-loption tellswcto count only the number of lines.Count only the number of words:
wc -w filenameThe
-woption tellswcto count only the number of words.Count only the number of characters:
wc -m filenameThe
-moption tellswcto count only the number of characters (this includes newline characters).Count only the number of bytes:
wc -c filenameThe
-coption tellswcto count the number of bytes in the file.Count words in multiple files:
wc file1 file2 file3This will display the line, word, and character counts for each file and then provide a total count at the end.
Combine options: You can combine options to get specific counts. For example, to get the number of lines and words:
wc -lw filenameCount from standard input: You can also use
wcwith input from another command or from the standard input:echo "Hello World" | wc -wThis will output
2because there are two words in "Hello World".
Here's an example output of wc:
wc example.txt
10  50 200 example.txt
This output indicates that example.txt contains 10 lines, 50 words, and 200 characters.
By using these options, you can effectively count lines, words, characters, and bytes in files or input streams in Linux.
Hardlink and softlink
Links are shortcuts. As in our Windows system, we use any application shortcut icon on our desktop.
Hardlink is responsible for lifetime service. If the main file is deleted, then hardlink will also work for operations.
Softlink is deleted if the main file is deleted.
To make a soft link:
ln -s "specific_path/file_name" "softlink_name"
To make hardlink
ln "specific_path/file_name" "hardlink_name"
cut is command to cut a specific amount of byte.
cut -b 1 "file_name"  #It will cut first byte
cut -b 1-4 "file_name"  # It will cut first 4 bytes
Now create a file using echo then print it and save it as a file.
echo "This is a file" | tee "new_file_name"
sort lines accordingly alphabetically
sort "file_name"
To see differences between two files.
diff "file_name" "file_name"
To see disk usages storages and so on
df
df -h   # high level disk storages
du .  # perticular folder related storages
Total process
top
Particular bash running in which ID
ps
ps aux       #totall information view.
fuser
To kill any process
kill -9 "ID"
Total Disk spaces
free
free -h
Application logs store in a file
nohup "used_command"
#Example: use free -h command and store the outputs by using nohup command
nohup free -h
# To see the saved logs file
cat nohup.out
To see virtual memory
vmstat
vmstat -a
Linux for DevOps
System-level Commands
To see which platform do you use.
uname
To see how many times your system is running.
uptime
To see user ID or user group ID
id
The apt command is a package management tool used in Debian-based Linux distributions, such as Ubuntu. It is used to manage software packages on the system. Here are some common apt commands:
Update Package List:
sudo apt updateThis command refreshes the local package list, pulling in information about available package updates.
Upgrade Packages:
sudo apt upgradeThis command installs the latest versions of the packages on your system.
Install a Package:
sudo apt install package_nameThis command installs a new package on your system.
Remove a Package:
 sudo apt remove package_name
 sudo apt remove docker.io  #Example
This command removes a package from your system while keeping its configuration files.
Remove a Package and Its Configuration Files:
sudo apt purge package_nameThis command removes a package along with its configuration files.
Search for a package:
apt search search_termThis command searches for packages matching the specified search term.
Show Package Information:
apt show package_nameThis command displays detailed information about a specific package.
Autoremove Unused Packages:
sudo apt autoremoveThis command removes packages that were installed as dependencies for other packages but are no longer needed.
These are just a few examples of the apt command. Depending on your specific needs, there are many other options and variations available. Always use sudo with apt commands to execute them with administrative privileges.
yum     # For CentOS
dnf     # For Fedora
pacman  # For Arch
rpm     # Redhat
portage # For Gentoo Linux and also ChromeOS
User and Group management Commands
The useradd command in Unix-like operating systems, including Linux, is used to create a new user account. The -m option, when used with useradd, ensures that a home directory for the new user is created. Here's the basic syntax:
sudo useradd -m "username"
Explanation:
sudo: Run the command with superuser (root) privileges.useradd: Command used to add a new user.-m: Create the user's home directory if it doesn't exist.
After running this command, a new user account will be created with the specified username, and a home directory will be created at /home/username. Note that you might need to set a password for the new user using the passwd command after creating the account:
sudo passwd username
Replace "username" with the desired username for the new user.
The su command stands for "substitute user" or "switch user." It allows you to change to another user account in the current shell session. If you want to switch to a specific user account, you can use the following command:
su "username"
or
su - "username"
Replace "username" with the name of the user account to which you want to switch. After entering this command, you might be prompted to enter the password for the specified user.
To display all users lists
cat /etc/passwd # Look at the last portion
To delete a user
sudo userdel "username"
To create a usergroup
sudo groupadd "group_name"
To display all group lists
cat /etc/group # Look at the last portion
To add a user to a group.
sudo gpasswd -a "username" "group_name"
To search any commands in linux cli click contr + r
To add multiple users to a group.
sudo gpasswd -M "first_username", "second_username","third_username" "user_group_name"
-M means multiple users.
To delete a user group,.
sudo groupdel "group_name"
File permissions commands


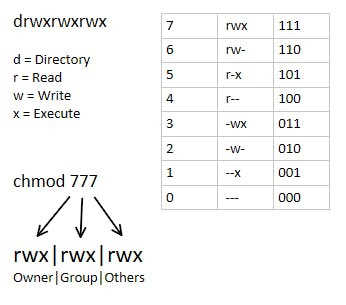
| Number | Binary | |||
| 0 | 000 | - | - | - |
| 1 | 001 | - | - | x |
| 2 | 010 | - | w | - |
| 3 | 011 | - | w | x |
| 4 | 100 | r | - | - |
| 5 | 101 | r | - | x |
| 6 | 110 | r | w | - |
| 7 | 111 | r | w | x |
chmod 777 "filename/foldername"
In computing, umask is a command that determines the settings of a mask that controls how file permissions are set for newly created files. It may also affect how the file permissions are changed explicitly. umask is also a function that sets the mask, or it may refer to the mask itself, which is formally known as the file mode creation mask. The mask is a grouping of bits, each of which restricts how its corresponding permission is set for newly created files. The bits in the mask may be changed by invoking the umask command.
umask         # display current value (as octal)
0022
umask -S      # display current value symbolically
u=rwx,g=rx,o=rx
umask -p      #
Symbolic and Numeric umask Values
As we mentioned in the example above, umask can be displayed as a numeric (octal) or symbolic value.
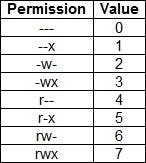
A mask can have the following numeric, and the corresponding symbolic, values:
| 0 | --- | No permission |
| 1 | --x | Execute |
| 2 | -w- | Write |
| 3 | -wx | Write and execute |
| 4 | r-- | Read |
| 5 | r-x | Read and execute |
| 6 | rw- | Read and write |
| 7 | rwx | Read, write, and execute |
To change the user ownership of a file.
sudo chown "username" "filename"
To change the group of a file.
sudo chgrp "groupname" "filename"
Compression commands
sudo apt install zip
To zip a folder
zip -r "new_zip_foldername" "dedicated_filder"   # If folder then use -r
#For unzipeed
unzip "file_name"
Compress a folder or file by using the tar command.
tar -cvzf "new_filename" "dedicated_file/folder"  #To compress c = compress. v =Display the verbose informations.
                               # z = Uses gzip compression. f = Specify the file name.
To extract the zip file or folder
tar -xvzf "zip_file/foldername"
File transfer Commands
To send a file from a local to a remote server.
scp -i "Users/nur/Downloads/mohammad.pem" "dedicated_filename" ubuntu@ec2-3-15-221-86.us-east-1.compute.amazonaws.com:"where you want this file in your remote server like- /home/ubuntu"
Now copy a folder from the remote server to the local server.
scp -i "Users/nur/Downloads/mohammad-key.pem" -r ubuntu@ec2-3-15-221-86.us-east-1.compute.amazonaws.com:"/home/ubuntu/'folder_name' ."
To add a local file to your local. It will not be on a remote server. In this case, we can use the rsync command.
Firstly, install rsync. And importantly need ssh connection.
rsync -e "ssh -i /Users/nur/Downloads/mohammad-key.pem" -avz "foldername_fromlocalserver" ubuntu@ec2-3-15-221-86.us-east-1.compute.amazonaws.com:/home/ubuntu/'folder-name'
Networking Commands
To check network working or not.
ping "IP_Address"/"Web_address"
Network statics
sudo apt install net-tools
netstat         # Active internet connections, ports. local and foreign IP's.
Network Interfaces
ifconfig
sudo apt install traceroute
sudo apt install inetutils-traceroute
traceroute youtube.com
tracepath youtube.com       #To see specific path
Note: To search IP address: https://whatismyipaddress.com/ip-lookup
ping and tracepath command togather.
mtr mmohamm5.github.io # mtr = my trace route.
nslookup mmohamm5.github.io
telnet mmohamm5.github.io 80
To see hostname
hostname mmohamm5.github.io
cat /etc/hosts
ip address show
To see Wireless connections
sudo apt install wireless-tools
iwconfig
Another network statics show command like netstat is ss
ss
to see details in an application
dig mmohamm5.github.io
To see domain name and registry
sudo apt install whois
whois mmohamm5.github.io
nc mmohamm5.github.io 80
To find mac address
arp
Interfaces running or not
suod apt install ifplugd
ifplugstatus
To call API's end point
curl -X GET https://dummy.restapiexa,ple.com/api/v1/employees | jq
# if it not work then install jq
sudo apt install jq
To download anything from internet
wget https://file-examples.com/wp-content/storage/2017/02/file-sample_100kB.doc
sudo iptables
To watch any specific commands. Every two seconds, it will show the result.
watch mtr mmohamm5.github.io   # By default it will run every in two seconds.
watch -n 5 mmohamm5.github.io   # It will run every 5 seconds.
Network map
sudo apt install nmap
nmap -v mmohamm5.github.io