Docker Basics
I am pursuing a Master's in Communication Systems and Networks at the Cologne University of Applied Sciences, Germany.
Docker was first released in March 2013. It was developed by Solomon Hykes and Sebastien Paul.
Docker is an open-source centralized platform designed to create, deploy, and run applications.
Docker uses the container on the host OS to run applications. It allows applications to use the same Linux kernel as a system on the host computer, rather than creating a whole virtual OS.
Docker is written in the GO language.
Docker is a tool that performs OS-level virtualization, also known as containerization.
Advantages of Docker
No pre-allocation of RAM
CI Efficiency: Docker enables you to build a container image and use that same image across every step of the deployment process.
Less Cost
It is light in weight
You can reuse the images.
Docker Architecture
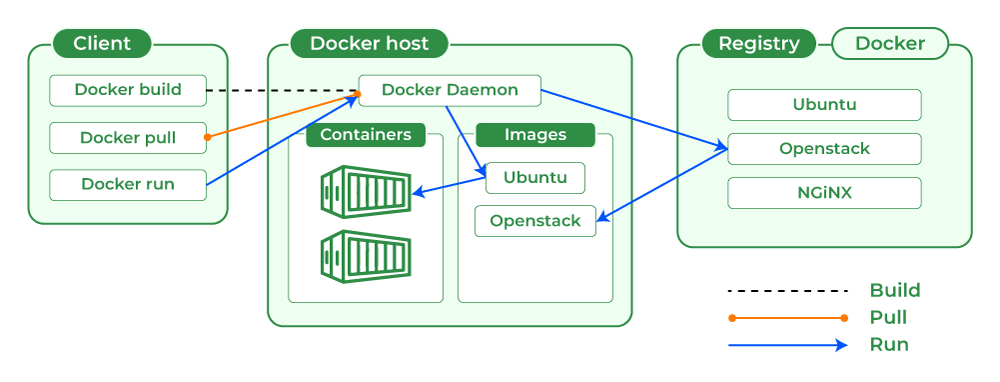
Components of Docker
Docker Daemon
Docker daemon runs on the Host OS.
It is responsible for running containers and managing Docker services.
Docker daemons can communicate with other daemons.
Docker Client
Docker users can interact with the docker daemon through a client
The Docker client uses commands and Rest API to communicate with the Docker daemon.
When a client runs a server command on the Docker client terminal, the client terminal sends the Docker commands to the Docker daemon.
Docker clients can communicate with more than one daemon.
Docker Host
A Docker host is used to provide an environment to execute and run the applications. It contains the Docker daemon, images, containers, networks, and storage.
Docker Hub/Registry
The Docker registry manages and stores the Docker images
Public: Docker Hub
Private: Enterprise
Docker Images
Docker images are the read-only binary templates used to create Docker containers. or a single file with all dependencies and configurations required to run a program.
way to create an image
Take an image from Docker Hub
Create an image from the Docker file
create an image from existing Docker containers.
Docker Container
The container holds the entire package that is needed to run the application.
Containers are like virtualization when they run on the Docker engine.
Docker's important commands
To see all images present in your local
docker images
To find images in the Docker Hub.
docker search <image_name>
To download an image from Docker Hub to a local machine.
docker pull <image_name>
To give a name to the container and run.
docker run -it --name <container_name> <image_name> /bin/bash
docker run --name my-nginx -p 8080:80 -d nginx
Note: It is in interactive mode and directs to the terminal.
To check whether the service is starting or not.
service docker status
To start the service
service docker start
To start or stop the container.
docker start/stop <container_name/ID>
To go inside the container
docker attach <container_name/ID>
How docker attach Works
When you use docker attach, you are connecting to the main process of a Docker container as if you were running that process in your terminal. This can be useful for debugging, monitoring logs, or interacting with applications running inside a container.
Key Differences Between docker attach and docker exec
docker attach: Attaches your terminal to the main process of the container. You can see all output and send input to that process. If the container's main process is not interactive (like an Nginx web server),attachwill just display the logs.docker exec: Creates a new process inside the container (e.g., starting a new shell session). You can use it to run commands independently of the container's main process.
Example Usage of docker attach
1. List Running Containers
To use docker attach, you need the name or ID of a running container. List all running containers using:
docker ps
You should see output similar to:
CONTAINER ID   IMAGE    COMMAND                  CREATED        STATUS        PORTS                  NAMES
a1b2c3d4e5f6   nginx    "/docker-entrypoint.…"   10 minutes ago Up 10 minutes  0.0.0.0:80->80/tcp   my-nginx
2. Attach to the Container
To attach to the running container's main process, use:
docker attach my-nginx
Replace my-nginx with the actual container name or ID.
3. Observe Output or Interact
Once attached, you can see the output from the container's main process in real time. If the process is running in interactive mode, you can also send input directly from your terminal.
Use Cases for docker attach
Debugging: Attach to a running container to observe logs and outputs for debugging purposes.
Interacting with an Interactive Application: If you started a container with an interactive terminal (e.g., running a script or application that requires user input), you can use
docker attachto provide input or interact with it.
Detaching from the Container
To detach from the container without stopping it, use the Ctrl + P and Ctrl + Q key sequence (press Ctrl + P, release, then press Ctrl + Q).
Important Considerations
Multiple Attachments: Multiple clients can attach to the same container, but be aware that input sent from one client will be broadcast to all attached clients.
Not Ideal for Background Services:
docker attachis not typically used for containers running background services (like Nginx, Apache, etc.) since these services don't expect direct terminal input.
Summary
docker attach: Connects your terminal to the main process of a running container to view output or interact with it.Use
docker attachfor debugging, monitoring, or interacting with containers running interactive applications.
To get access of a container. Here my container is nginx.
docker exec -it my-nginx /bin/bash
#Check Nginx Status:
root@a1b2c3d4e5f6:/# service nginx status
#View Nginx Configuration:
root@a1b2c3d4e5f6:/# cat /etc/nginx/nginx.conf
#Edit Nginx Configuration:
#Use vi or nano (if available) to edit the Nginx configuration files:
root@a1b2c3d4e5f6:/# vi /etc/nginx/nginx.conf
Give users privileges.
sudo usermod -a -G docker $USER
Note: After you do it, reboot your server.
To see all the containers
docker ps -a
To see only running containers.
docker ps
To stop the container
docker stop <container_name>
To delete the container
docker rm <container_name>
To delete the images
docker rmi <image_name>
or
docker image rm <image_name>
Run MySQL through Docker:
Pull the MySQL images from Docker Hub
docker pull mysql
Make a container from this image:
docker run -it --name my-db mysql:latest
Note: Give a password because DB is important.
Now run this command:
docker run -d --name my-db -e MYSQL_ROOT_PASSWORD=test@123 mysql:latest
Note: If errors happen because we made them before, So we need to delete the old container.
docker rm <container_ID>
Now run the docker run command with a password.
MySQL access on the command line: It will use bas
docker exec -it <container_name> bash
Now, in the bash terminal, we will be in the MySQL database. To enter the DB, run the following command:
bash-4.4# mysql -u root -p
Note: It will require a root password to enter the database.
Once you enter the database, you will see MySQL CLI.
Run the following command to see databases:
mysql> show databases
    -> ;
Run Jenkins through Docker
docker pull jenkins/jenkins
Note: Change the instance inbound rule for Jenkins.
Docker file Creation
Without the Docker file, try to install the Python application:
If we have a Python application, then first install Python.
pip3 install django ==3.0.3
Note: Django install
run python
python3.9 manage.py runserver
It will require a lot of steps, and you will face a lot of difficulties. Now the best way is to make a Dcokerfile, where we will write all the required steps.
So,
OS-- Inside that should python be installed.
Dockerfile
FROM python:3.9
COPY . .
RUN pip install -r requirements.txt
EXPOSE 8000
CMD" ["python", "manage.py","runserver", "0.0.0.0:8000"]
"FROM Python: 3.9" means it will install Linux and Python 3.9
"WORKDIR app," in which directory you are currently working. (In the background: mkdir app and cd app) COPY . /app
COPY." The first dot is the source on your computer, and the second dot is a destination on your Docker container.
"RUN pip install -r requirements.txt" {Note: you can install anything here.
The requirements.txt file has all the requirements that are needed for this application. (-r = recursively)
"CMD" ["python", "manage.py, runserver"] {CMD is execution step.
It takes a list of keywords. It will run after making the container.
"runserver" is a command that can play your code
"ENTRYPOINT" Similar to CMD but with higher priority, the first commands will be executed by ENTRYPOINT only.
"ENV" Environment Variable
"ARG" To define the name of a parameter and its default value, the difference between ENV and ARG is that after you set env, Using ARG, you will not be able to access that later on when you try to run the Docker container.
Docker file to Docker image:
Now the Docker file is created. So, now we will make a Docker image.
docker build .
Add tag and to image
docker build . -t django-app:latest
Now create a docker image for a container
docker run -d -p 8000:8000 django-app:latest
Docker Loggging
- To check the container log, run the following command:
docker logs <container_ID>
- To check the real-time container log.
docker attach <container_ID>
Note: It will attach your terminal to the particular container terminal.
Docker Volume
Volume is simply a directory inside our container.
Firstly, we have to declare this directory as a volume and then share the volume.
Even if we stop the container, we can still access the volume.
The volume will be created in one container.
You can declare a directory as a volume only while creating the container.
You can't create volumes from an existing container.
You can share one volume across any number of containers.
The volume will not be included when you update an image.
We can map volume in two ways:
container -- container
Host: Container
Benefits of Volume
Decoupling the container from storage
Share volume among different containers.
Attach the volume to containers.
On deleting the container, the volume does not delete.
Mount a volume with a container
Copy your dedicated volume directory path.
Create a Docker volume with the following command:
docker volume create --name <volume_name> --opt device=/home/ubuntu/volumes/djangon-todo-vol --opt o=build --opt type=none
- Inspect the volume.
docker volume inspect <volume_name>
docker volume ls    # To see the volume
docker volume inspect <volume_name>
- Mount this volume with this command.
docker run -d -p 8000:8000 --mount source=<volume_name>,target=/app <images_name>

docker run -d -p 8000:8000 -v /home/ubuntu/My_django_demo_app/docker_volume:/app django-app:latest
docker run -d -p 8000:8000 --mount type=bind,source=/home/ubuntu/My_django_demo_app/docker_volume,target=/app django-app:latest
mkdir -p /home/ubuntu/My_django_demo_app/docker_volume
sudo systemctl restart docker
docker inspect 68976682a894
docker exec -it 68976682a894 /bin/bash
root@68976682a894:/# ls /app
- Go to the inside of the Docker container.
docker exec -it <container_ID> bash
- Now create any files inside the container and save them. After that, go back to the local directory, and we will see the same files that were also created here.
touch test.log && echo "hi" > test.log
nohup command.
Nohup is a POSIX command that means "no hang up". Its purpose is to execute a command such that it ignores the HUP signal and therefore does not stop when the user logs out. Output that would normally go to the terminal goes to a file called nohup.out, if it has not already been redirected.
Note: Change the Dockerfile. Edit it and add nohup in the CDM section.
FROM python:3.9
COPY . .
RUN pip install -r requirements.txt
EXPOSE 8000
CMD" ["nohup","python","manage.py","runserver","0.0.0.0:8000","&
"]
Note: Save this Dockerfile. Now build the image and run it as a container. (> = this sign means redirect the output.)
To check logs and save logs as text files.
echo docker logs "conatiner_ID" > logs.txt
Important Term
1. docker run -d: Runs the container in detached mode (background).
Explanation:
The
-dflag stands for detached mode.When you run a container in detached mode, it runs in the background, meaning you won't see its output directly in the terminal.
You can still interact with the container later using commands like
docker logs,docker attach, ordocker exec.
Example Usage:
docker run -d nginx
This starts an Nginx web server container in the background.
The terminal does not display anything unless you explicitly check logs or attach to the container.
Checking Running Containers:
After running a detached container, you can check if it's running with:
docker ps
Viewing Logs of a Detached Container:
If you want to see what’s happening inside the container:
docker logs <container-id>
or for real-time logs:
docker logs -f <container-id>
Stopping a Detached Container:
If you need to stop the container, use:
docker stop <container-id>
2. docker run -it: Runs the container in interactive mode with a terminal.
Explanation:
The
-iflag keeps the container’s STDIN (standard input) open, allowing you to provide input.The
-tflag allocates a pseudo-TTY (terminal), allowing for an interactive session.This is useful when you need to run commands inside the container, like starting a shell.
Example Usage:
docker run -it ubuntu /bin/bash
This starts an Ubuntu container in interactive mode and gives you a shell (
/bin/bash).You can type commands inside the container, just like a normal terminal.
Exiting an Interactive Container:
To exit the interactive session:
Type
exitand press Enter, orPress
CTRL + D.
Background Execution After Interactive Start:
If you started a container interactively and want to detach it (send it to the background), use:
CTRL + P, CTRL + Q → This will leave the container running.
Later, you can re-attach to it using:
docker attach <container-id>
Key Differences:
| Mode | Flag | Runs in Background? | Interactive Terminal? | Example |
| Detached | -d | ✅ Yes | ❌ No | docker run -d nginx |
| Interactive | -it | ❌ No | ✅ Yes | docker run -it ubuntu /bin/bash |
When to Use Each?
| Scenario | Use |
| Running a background service (e.g., a web server) | docker run -d |
| Running a container where you need to interact (e.g., debugging, testing commands) | docker run -it |
Final Example: Combining Both (-dit)
If you want a background container but also with a terminal, you can combine both flags:
docker run -dit ubuntu /bin/bash
- The container runs in the background but allows interaction when needed using
docker execordocker attach.